This article explains how to update the URL of a WordPress website using the WordPress Management tool in cPanel.
This functionality is typically used after:
-
Manually transferring a WordPress site of a different domain from another server
-
Changing the domain used by an existing WordPress installation
It allows you to update the WordPress Site URL and Home URL values directly from cPanel without logging into the WordPress admin area.
Related article (domain-level changes): How to Change the Main (Primary) Domain of a cPanel Account
Important limitations (please read first)
The Update Site URL function only updates the core WordPress URL settings.
It does NOT update:
-
Absolute URLs stored in the WordPress database (e.g. post content, page builders, widgets)
-
Hardcoded paths in theme or plugin files
-
References in the WordPress configuration file (
wp-config.php) -
Custom upload paths or hard links
-
Serialized data created by plugins
After updating the URL, you may still need to:
-
Perform a database search-and-replace
-
Update configuration files manually
-
Clear caches and regenerate permalinks
Failure to do so may result in mixed-content warnings, broken images, or missing styles.
When not to use this function
Some users may copy the files of an existing WordPress site into another directory on the same cPanel account and then use Update Site URL to make it work under a new URL.
This approach is not recommended.
Reasons:
-
The database remains shared or incorrectly referenced
-
Absolute paths are not updated correctly
-
Plugin and theme data may break
-
Future updates become unreliable
If you want a second copy of a WordPress site on the same account, you should clone the site instead.
Recommended guide: How to clone a WordPress website using WordPress Management
How to update the WordPress site URL
Step 1: Log in to cPanel
Log in to your cPanel account: Accessing your hosting control panel (cPanel)
Step 2: Open WordPress Management
In cPanel, navigate to WordPress Management (formerly known as WP Toolkit):

You will see a list of all detected WordPress installations on your account.
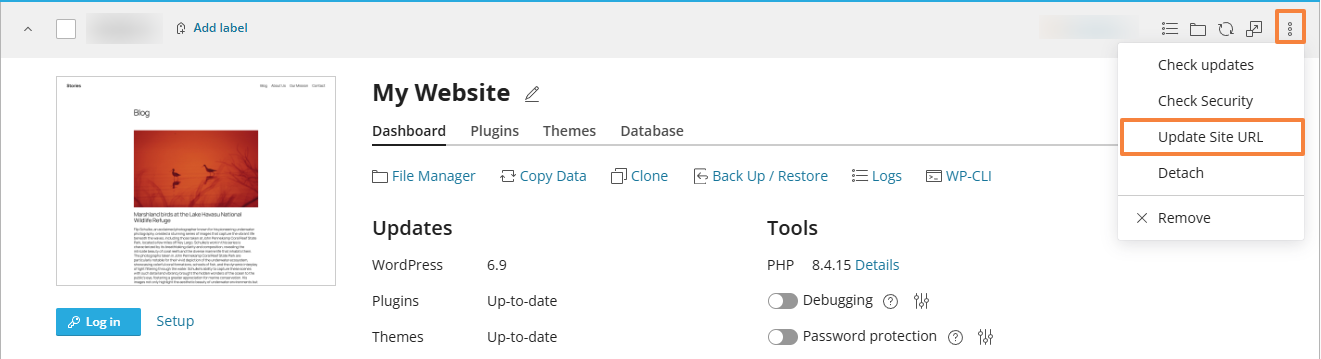
Step 3: Open the site actions menu
Locate the WordPress installation you want to update.
Click the three-dot (⋮) menu on the right-hand side of the site entry and select Update Site URL.
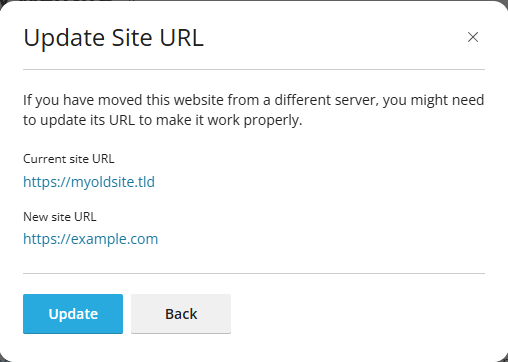
Step 4: Review the current and new URL
A dialog window will appear showing:
-
Current site URL (existing WordPress address)
-
New site URL (the URL you want to use)
Carefully verify that:
-
The new domain or subdomain already exists
-
DNS is correctly pointing to this hosting account
-
The directory matches the WordPress installation (use the File Manager button to confirm)
Step 5: Apply the update
Click Update to confirm the change.
The tool will update the WordPress Site URL and Home URL values.
After the update
Once the URL has been updated, we strongly recommend the following checks:
-
Visit the site and verify that pages load correctly
-
Check images, CSS, and JavaScript files
-
Clear all WordPress and server-side caches
-
Re-save Settings → Permalinks in the WordPress admin
-
Review the database for old URLs if issues persist
If the site was moved between servers or domains, a full database search-and-replace may still be required.
Related Articles
Summary
-
Update Site URL is suitable for correcting WordPress URL settings after a move or domain change
-
It does not update absolute paths or hardcoded references
-
It should not be used as a replacement for proper cloning
-
For multiple copies of a site on the same account, always use the Clone feature
If you are unsure whether this function is appropriate for your situation, please contact support before proceeding.
Updated by SP on 23/12/2025


